- Home
-
Collections
-
Fudge
-
Events
-
Retail Shop
- Chocology Today
-
July 19, 2016

Want to do something fun, tasty and educational with the kids this summer? Well, grab these simple supplies and get outside for a science project that will have your kids coming back for s’more!
DIY SUN S’MORES
In this Chocology Kids Project you will learn about:
Energy, Solar Power, Sun, Heat/Melting Point, Cooking
INGREDIENTS:
Graham crackers, mini-marshmallows and a chocolate bar or (Fat Ass Fudge!).
TOOLS NEEDED:
Scissors, Ruler, Glue Stick, Plastic wrap, Tape, A Sheet of black paper, A wooden skewer or pencil, Utility knife, Aluminum foil, 2 thermometers
A Warm, sunny day—preferably 85 degrees or warmer
PREPARATION INSTRUCTIONS:
Please read ALL of the steps carefully before cutting. Adult assistance is recommended for the use of utility knife. Also, use caution when cooking with the solar oven. It can get quite hot (sometimes up to 200 degrees)
BUILDING THE OVEN

Step 1
Clean out the pizza box.
Step 2
Use your ruler to draw a rectangle on the top of the lid, about 1 inch from the sides.
Step 3
Ask an adult to help using the utility knife (and the ruler as a straight edge) to carefully cut along 3 sides of the square, leaving the side that runs along the hinge of the box uncut. Cut all the way through the cardboard on those three sides. Once your 3 sides are cut, fold the flap (near the hinge of the box) back slightly along the attached side. Prop the flap open with tape. Lastly, cover the inside of the flap with foil,(leaving the shiny side of the foil facing out) securing with glue or tape.
Step 4
Cover the opening made by the flap (in the lid) with a layer of plastic wrap. Attach the plastic wrap to the opening's edges using shipping tape or duck tape. Make sure there are no holes in the plastic wrap and that all of its edges are completely attached to the lid. No openings please!
STEP 5
Line the inside of the box with aluminum foil (shiny side out) so that when you shut the box the entire interior is coated with foil. It is easiest to do this by covering the bottom of the box with foil first and then covering the inside part of the lid (don’t cover the plastic wrap!) with foil. Glue the foil in place.
STEP 6
Glue or tape a sheet of black paper to the bottom-center of the pizza box, on top of the foil. This will act as your solar oven's heat sink. How do you think it will help cook your food?
Step 7
Lastly, use a wooden skewer or pencil (and some tape) to prop the solar oven's lid up, at about a 90-degree angle from the rest of the box.
Think about this:
Let’s Make S’mores!

Before you begin, go check your weather app to see what the temperature is outside. Is it over 85 degrees? Then let’s get cooking!
STEP 1
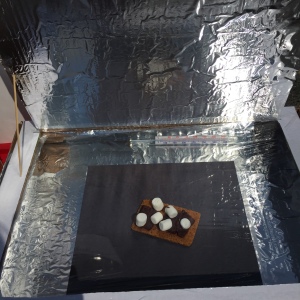
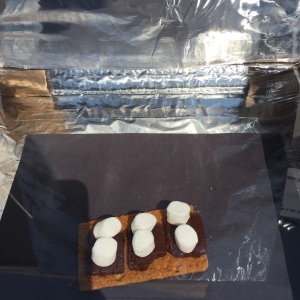
Place your chocolate and mini marshmallows between two graham crackers.
STEP 2
Place your S’mores inside of your solar oven
STEP 3
Take your oven outside. Be sure to place your oven in a place in a sunny place, taking care to position it to where the sunshine will refect from the foil on the flap into your box.
STEP 4
Check your box every 15 minutes to see if the chocolate and marshmallows have melted. BE CAREFUL! It might just be a pizza box, but you’ve made this into an oven! IT’S HOT!
STEP 5
Bon Appétit! Enjoy your Sun S’mores!

Think about this:
What Is Going On?
Solar Ovens convert sunlight to energy. That energy is retained for cooking food. Although there are all kinds of solar cookers, they all have similarities. For instance, many solar ovens have at least one dark surface to attract sunlight. If you’ve ever worn a black shirt on a hot summer day, you’ve probably noticed that dark colors get very hot in the sunlight. This is because dark colors hold more solar radiation than light colors. The heat absorbed by your dark paper is transferred to the food, which speeds up the process. Most solar cookers also have reflectors, which direct sunlight toward the dark cooking surface and transparent tops that let in sunlight, trapping the heat inside the cooker. Try cooking hot dogs inside of your solar oven and see what happens!
What Else?
Did you have fun with this activity? We hope so. We encourage you to try it again with different variables. Here’s some to try:
Be sure to check our blog for more fun chocolate activities to do with the kids! Learning should be fun!
Comments will be approved before showing up.
